
The BookPoints application offers two choices of logo/header style.
Style 1 uses a small square logo image file. There is a large text section for the name of the site (e.g., "Anytown Public Library" in the example below), and a smaller text section for a "slogan" or sub-title. Each of these text sections is customizable, and you can also tweak the text color and font.
![]()
Style 2 has no text sections, just one wide image graphic that covers the entire header of the site. The recommended dimensions for this graphic are 1575 pixels width by 347 pixels high, but the system is flexible and will attempt to grow/shrink your graphic to fill the entire header image.
![]()
Uploading Your Logo Image
Whether you use style 1 or style 2, you'll need to upload a logo image for your website. Choose Setup Menu > Design Customization to access the design options screen. Scroll down and open the Logo Image Settings panel. Use the Upload Logo Image field to select your logo image from your computer. After you've selected your logo image, click the Save Configuration button to save your work.
![]()
Style 1: Small Logo and Text
To use Style 1, after uploading your logo:
- Visit Setup Menu > Design Customization to access the design options screen.
- Scroll down and open the Toggle Display panel.
- Check the "Logo," "Site Name," and "Site Slogan" boxes as shown in figure 1 below.
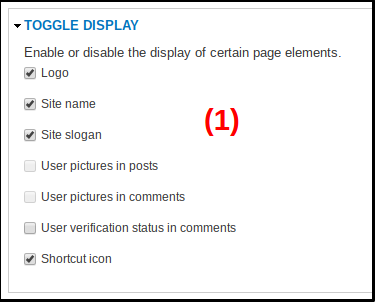
- Click the Save Configuration button to save your changes.
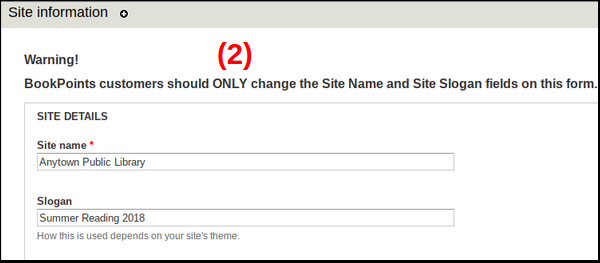
- Visit Setup Menu > Site Title & Slogan to set your website's name (large text) and slogan (smaller sub-text) as shown in figure 2 below.
- Click the Save configuration button to save your changes.
Style 2 - Banner Graphic, No Text
To use Style 2, after uploading your logo:
- Visit Setup Menu > Design Customization to access the design options screen.
- Scroll down and open the Toggle Display panel.
- Check the "Logo" box and UNcheck the "Site Name," and "Site Slogan" boxes as shown in figure 1 below.
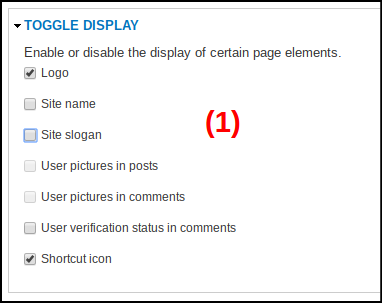
- Click the Save Configuration button to save your changes.
- Visit Setup Menu > Site Title & Slogan to set your website's name (large text) and slogan (smaller sub-text) as shown in figure 2 below. Even though these will not be visible in the site header, they will still be visible to Google and in the browser's title bar, so it's a good idea to set them.
- Click the Save configuration button to save your changes.
